Harry Bailey

Delivery Coach for Teams, agility coach and mentor

The Compound Effect of Starting Projects Well

Act One. Scene One. The Start.

“Let’s just get started. We’ll work it out as we go. Who needs a plan anyway? We’re Agile!”

We knew some stuff. We certainly had enough excitement. The roadmap would become clearer as we did the work and made progress.

Or at least that was what we assumed. But 20 years ago I was still learning my trade.

And sure enough, not far into the project things got sticky. We’d made decisions without the client. Some which would be tough to undo. But undo them we must. Time and money had been wasted.

The key learning at the time was to know as much as possible before starting. Workshopping, user research, data analysis, paper prototyping. With the client stakeholders.

Often discussions we’d be having as we went anyway, just frontloaded to ensure we all headed in the right direction as a single group.

We found that starting things well had a compound effect on the remainder of the project. A poor start was impossible to compensate for later. Aligning, understanding and agreeing could (and should) all happen before work began.

Then, the majority of projects could be focused on doing, and smaller discoveries and changes to maximise the value being created.

And that’s now a key part of the approach I take with teams. We focus on starting projects well. Aligning around the needs, and a plan, and only then getting started.

Why Agencies Can’t Quit Their Really Bad Estimates

a mountain of colourful dice

If estimating things is so hard, why don’t agencies just stop doing it?

The majority of agency leaders I know don’t like estimates much. Never accurate enough to be trusted, and usually too optimistic. If delivery teams could just be better at creating them, there would be more certainty around timelines.

Delivery teams don’t like estimates either. They take a lot of time to create, and although called ‘estimates’ they often lead to expectations about delivery dates.

So let’s just stop estimating!

Continue reading

But… can we deliver it?

There is a lot of focus put on the sales process at agencies. Sell more things to more clients. Sign contracts quickly and fill in all the details later. Keep the sales function separate from the challenges of project delivery.

It can be tempting to rush through the early stages of a client relationship. Promising the world to build trust and worrying about how to deliver on those promises later.

Saying no to that project that won’t be able to start for at least 3 months is hard. Surely there’s a way to make it fit earlier?

Agencies solve sales problems early. Niche down. Clear pitch. Know your market.

You know you can sell things
You can certainly schedule them in
You’ll plan what needs doing, and by who
You can track progress to the minute
You can even be prepared to support what you create

The big question is… can you deliver it?

Getting a great outcome for the team, the client and your bottom line.

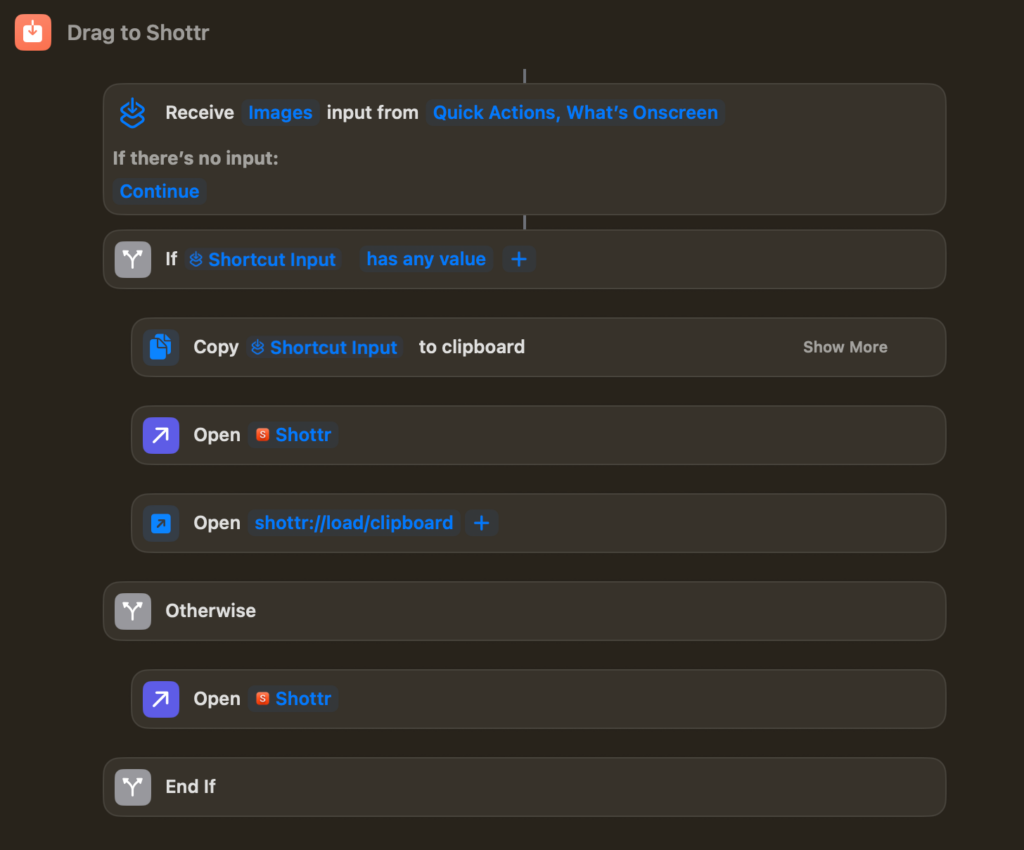
Updating PHP on an AWS Lightsail WordPress Stack – Version 2

I’ve decided to rewrite the previous version of this article. It’s been cloned and copied loads of times, and to be honest it got bloated. I also prefer this new way.

This guide aims to only take you through the steps I use now when a PHP version update is needed for my AWS Lightsail Bitnami WordPress install.

No fluff. Limited details. Just 7 steps and 3 optional ones.

You follow this guide at your own risk. Back up your site first. The older version of this article is still valid if there isn’t enough information for your needs here.

The main change here is we’re going to use a very simple maintenance plugin which shows a message in the short time required between moving to the new install and importing the old blog backup. This does away with the potential complexity of the Lightsail IP address being saved to the database as part of the migration.

Ready?

Read more: Updating PHP on an AWS Lightsail WordPress Stack – Version 2

This guide assumes you have a static IP on your current Lightsail instance. If you don’t, this guide isn’t for you.

1. Create a new AWS Lightsail instance

Match the instance type of the current setup unless you know otherwise. Choose a name you’ll remember for the following steps. For this guide, we’ll use New Instance, and Old Instance for our instance names.

2. Tweak the New Install’s PHP settings

Choose to ‘connect using SSH’ to New Instance.

Run cat bitnami_application_password and take a note of the password for later

Run sudo nano /opt/bitnami/php/etc/php.ini

Use ctrl-w to trigger a search, or look manually for the partial max_size and change the value from 80MB to whatever you need. It’s temporary, go wild.

Use ctrl-w to trigger a search, or look manually for the partial max_file and change the value from 80MB to whatever you need. It’s temporary, go wild.

Run sudo /opt/bitnami/ctlscript.sh restart to restart Apache and apply the new upload limit settings

Keep this window open for use in step 6.

3. Get migrate and maintenance ready

Open the New Instance’s wp-admin. If you don’t know how via the IP address, there’s a button at the top of the page in LightSail admin which says ‘Access WordPress Admin’. Log in using the username user and the password that you made a note of in the step 2.

Go to plugins in the navigation

Click enable next to WP migrate (it’s installed by default). If you don’t see it, click ‘Add New’ – search for ‘Migrate’ and install and enable ‘All-in-One WP Migration`

Click the ‘Add New’ button and search for ‘Maintenance’ – Install and enable ‘WP maintenance’

Click ‘WP maintenance’ in the left nav. Change the body text to ‘We’ll be back in a few minutes’, because the default message isn’t ideal. Save.

Enable maintenance mode, and save again. New install now in maintenance mode, although you can still see it because you’re logged in as admin.

4. Export the live site

I do this at step 4 to limit the time between export and import, but if you’re not as bothered, you could save overall time by starting this step first, and doing other steps while the export is taking place.

Open the live site’s wp-admin. Go to plugins. Enable ‘All-in-One WP Migration’, or if required, click ‘Add New’ as above, install and enable it.

Click ‘All-in-One WP Migration’ in the left nav. Click ‘Export to’. Select ‘File’.

When the process has finished, click the download button to do the actual file downloading to your machine.

From step 5 you’ll want to move fast if limiting downtime (length of maintenance message display) is important to you. It took me about 5 minutes from this point for a 350MB WordPress site.

5. Move the live domain to the new site

In Lightsail admin navigation click Networking, then click the name of the static IP associated with the currently live site.

On the manage screen for IP, click to detach it from Old Instance. Then immediately reattach it to the New Instance.

6. Add an SSL Certificate to New Instance

Still got the New Instance SSH window open? Switch to it, or open it again.

Run sudo /opt/bitnami/bncert-tool

Submit your domain name without www. Choose your preferred answers to the questions that follow. Stick in an email address. Agree to the right things with Y / n. Complete the process.

Reload, or open your live domain name in a browser. Keep refreshing, and pretty quickly it should go from not loading, to loading again.

7. Import to New Instance

Open up your live domain wp-admin. Log in using your settings above. So user and password you made a note of.

Open All-in-One WP Migration and choose import. Choose File. Choose the file from your computer.

Wait. It should succeed. Only file size might stop it working, but fingers crossed. It will probably ask if you’re sure.

There you go. The site, file and database are moved to New Instance.

8. Put the settings back

Go back up to step 2 above and reverse the changes to php.ini on New Instance – or don’t. It’s up to you.

Check Setting => General. If your domain name shows as http:// and the field is readonly, you need to edit wp-config.php so in the New Instance SSH window…

Run nano /opt/bitnami/wordpress/wp-config.php find WP_HOME and WP_SITEURL and update to https://

9. Remove Old Instance

You can now ‘Stop’ or even remove old instance. I usually Stop mine, but keep it a few days just in case.

If you messed anything up above, the only change required to go back is step 5 in reverse. Point the static IP back to Old Instance. Insure it’s not Stopped first.

Agile Principles & Your Agency: How to Live and Love Them

Text on what. "What works for your agency over Agile Frameworks"

Many agencies aspire to be Agile. Stories fly around social media about the successes of software teams who implemented an Agile Framework and immediately began reaping the rewards.

But Agile was created solely by men working in product organisations (or product-led organisations) that built software. They didn’t have agencies in mind when they coined the principles and values. They weren’t considering Agile as a way to delivery things other than software.

Agencies are not product-led organisations. They are project-led organisations. They have complexity and unknowns, where product-led organisations often have focus and clarity.

That doesn’t stop agencies valuing agility. And agencies can implement much of what it means to be Agile. But it does realistically stop off-the-shelf implementation of an existing Agile Frameworks (such as Scrum).

So if existing Frameworks can’t shortcut an agency to agility, how do we begin our journey, and what should we value when looking for better ways of working?

Continue reading