I recently moved from Monosnap to Shottr for screenshots on my Mac. Shottr has a whole lot going for it, and it was the right move, but the biggest frustration was how to open images in Shottr quickly.
In Monosnap I almost always dragged the existing image from a browser, or Finder onto the menubar icon. Monosnap would show a little drop zone, you dropped your image file and Monosnap would review it in a new window. Shottr doesn’t yet allow dropping onto the menubar icon.
Also, shottr has a lot of shortcut key options, but none of them are ‘Load from Clipboard’. This is only available via the options list. So my clumbsy workflow was… right click and copy an image, click Shottr menubar icon, move down to ‘More’ then move down and click ‘Load from Clipboard’.
I decided there had to be a better way which allowed drag-and-drop, and after a little whle trying things out I found it.
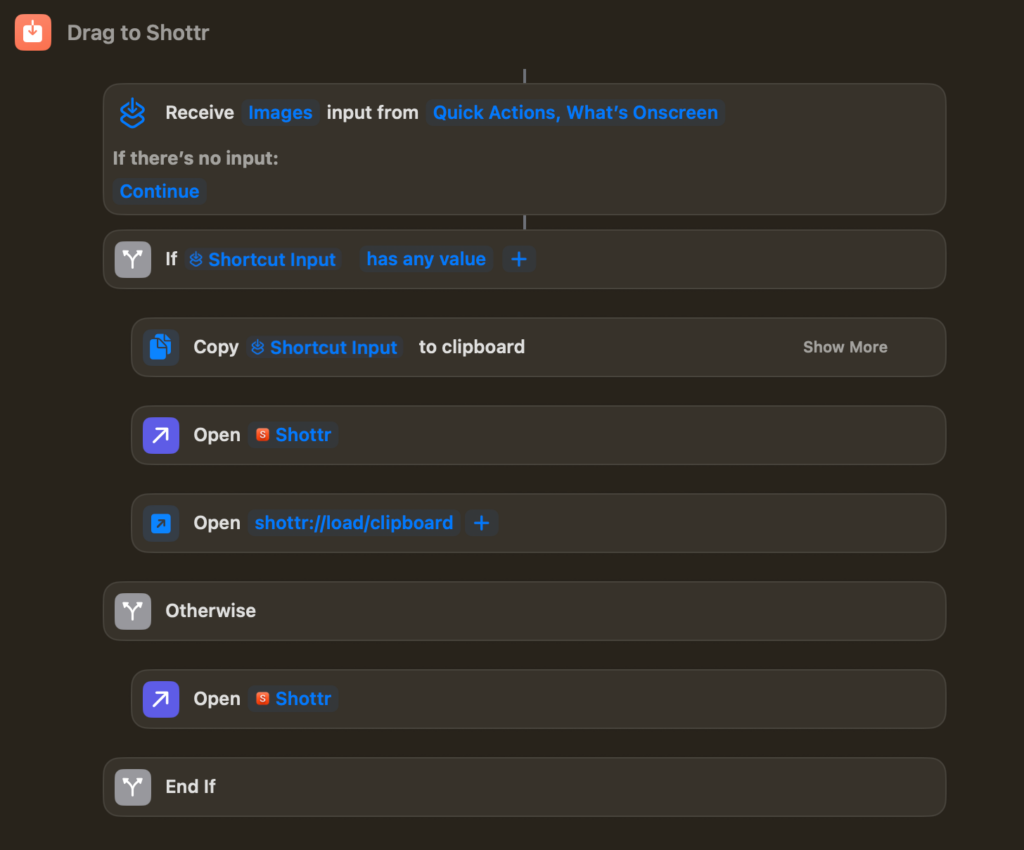
Using the Shortcuts app in MacOS you can create a dock icon which receives the dropped image, copys it to the clipboard then triggers Shottr to open from clipboard.
It uses a combination of standard items, like copy to clipboard, open app, and trigger local app url scheme destinations.
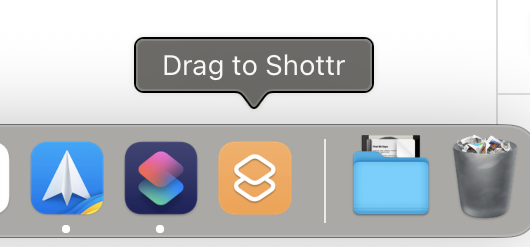
Once you have the Shortcut built (or installed), click ‘File => Add to dock’ in the menu bar. If you make any changes to the app you might need to remove the existing app from the dock before using ‘Add to dock’ again.
You should now be able to drag any valid image to the new shortcut dock icon and after a second or two it will open in Shottr.
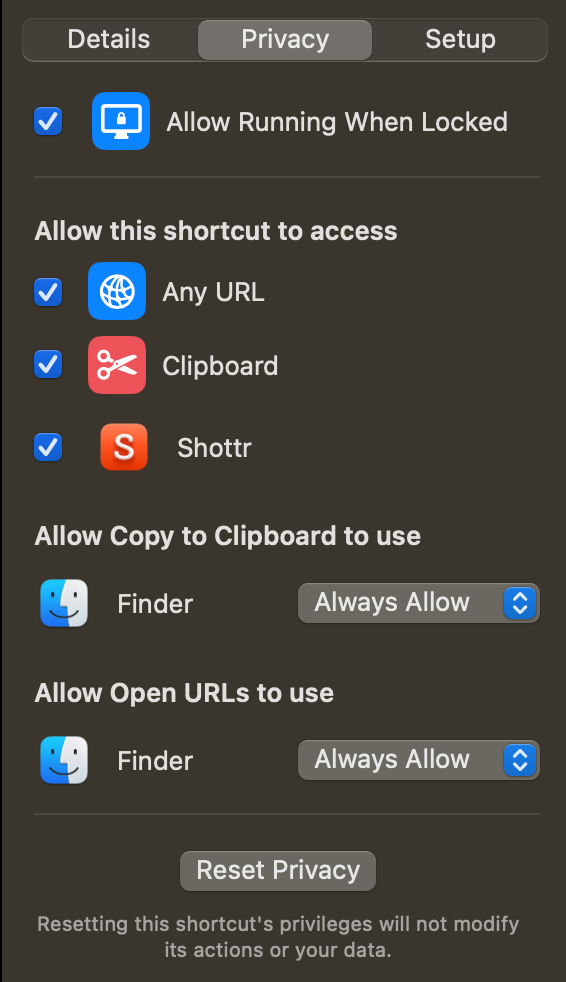
If you want to set it up from scratch, here are screengrabs of the Details and Privacy tabs. You might have to run inside Shortcuts with the play icon to give permissions before it functions correctly.
You can let me know if:
‘Allow running when locked’ can be unchecked
‘Receive what’s on screen’ can be unchecked
You truly need to trigger open Shottr before triggering the open clipboard url
Helpful? Say thank you.
Help me keep these guides up to date by showing your apprechiates with a small donation. Scan the QR code below, or buy me a coffee here.
1Password is brilliant for keeping your online life secure, but it does not yet have a simple way to pass on selected information after you die. There is no built in legacy contact feature, and organisers cannot access your private vaults. This leaves a gap for anyone who wants to share only some things with family in the future without giving away their whole account.
After testing different options, I found a straightforward approach that works well. It gives your family the information you want them to have, keeps your private vaults private, and avoids complicated workarounds.
Updated 6th October 2025 to reference new token requirement for loading instance meta data
So let me first confirm what won’t work. Whether Apache 1, Apache 2, leader_only or EB_IS_COMMAND_LEADER testing, you cannot consistenty get exactly one (not zero, or 2+) instances to run a cron job over a long period of time.
The issue is the the leader information isn’t safe. It’s only available during deployments, when you usually first set up the cron job. But when an instance replacement happens—for whatever reason—there is no related deployment, the test to check if the new instance is the leader fails, and you end up with no crons.
So for anything you do at the moment of deployment—database migrations, logging, whatever— that you only want to run once, even on multi-instance environments in an Elastic Beanstalk Application, you can use and trust the leader tests available to you.
But for anything you want to run regularly, on a schedule across weeks and months, you cannot trust those options.
After a lot of research, and trial and error there are two options available to you.
Worker environments
The ‘official’ way is probably via a worker environment. Essentially an instance set up specifically to schedule and run short or long lived processes.
You can learn more about them via the links below, but for the rest of this article we’ll be talking about the alternative option of ‘runtime leader testing’.
This option means running the cron on every instance of an environment, but the initial section of the code being run checks the if the instance id that it’s running on is the first to be returned in the list of all instances. That is, only the first instance id returned by the aws elastic beanstalk api will continue to run the task.
Below the examples are in PHP, but it’s a valid method for other languages too.
We’re assuming you’ve already set up a cron and know how to alter it to make it run on all instances of your environment.
The steps in this guide:
Create an IAM user just for this process and give it limited read permissions
Add the credentials to EB configuration
Write code to check the instance id from the api against the current instance id
Adding the user
Open IAM in AWS console
Click Users
Click Add users
Type your User name – we used “[applicationCode]-eb-read-user”
Click the ‘Access Key’ access type
Click Next: Permissions
Click the ‘Attach existing policies directly’ tab
Type ‘AWSElasticBeanstalkReadOnly’ and select it
NB: This permission actually gives more access than is required and you could trim it further
Click Next: Tags
Click Next: Review
Click Create user
Take a copy of the KEY and SECRET
Storing the key and secret in the environment
Open your environment
Click configuration
Click ‘edit’ on the ‘Software’ section
Add two new items, one for the key (examples use AWS_KEY) and one for the secret (examples use AWS_SECRET)
The code
So this is php, but the basic idea is:
Install the aws library – here we use composer
Add some code to call the library
Compare the first returned instance id against the id of the instance running the code
Then compare the API’s first result to the current one. If the same, so something, otherwise don’t.
if ($currentId == $result['EnvironmentResources']['Instances'][0]['Id'])
{
    // do something. Only one instance will get here
}
else
{
    // don't do anything. All other instances will be here
}
Helpful? Say thank you.
Help me keep these guides up to date by showing your apprechiates with a small donation. Scan the QR code below, or buy me a coffee here.
Note 1: Read the guide in full before you do anything. You’ll want to confirm it matches your situation and expectations.
Note 2: You can’t simply update PHP on an AWS lightsail WordPress stack. You have to migrate to a new instance with the latest version of PHP in it. That is what this guide shows you how to do.
Note 3: This guide assumes you have a static IP on your current Lightsail instance. If you don’t, you could possibly assign one in advance, but otherwise this guide isn’t for you.
I last ran through this guide myself on 26th January 2026 on this very site, which is about 750MB. I took it from PHP 8.2 to 8.4. WordPress 6.9 was installed on both source and destination instances during the process. With fast broadband it was down for less than 5 minutes.
I decided to rewrite the previous version of this article. The original has been cloned and copied loads of times, and to be honest it got bloated with updates and comments. I also prefer this new way. It’s fast and avoids issues with SSL certificates.
This guide aims to only take you through the steps I use now when a PHP version update is needed for my AWS Lightsail Bitnami WordPress install.
No fluff. Limited details. Just 7 steps and 3 optional ones.
You follow this guide at your own risk. Back up your site and read the full article through first. The older version of this article is still valid if there isn’t enough information for your needs here.
The main change here is we’re going to use a very simple maintenance plugin which shows a message in the short time required between moving the domain over to the new install and importing the migration file. This does away with the potential complexity of the Lightsail IP address being saved to the database as part of the migration.
Before you spend time upgrading to a new lightsail instance in the hope of your PHP version meeting WordPress minimum requirements, it’s useful to know if the version available is high enough.
You can check which PHP version you’re going to end up with using the following steps:
If no match, keep reading down the file until you find the first match for Updated php to
That’s the current PHP version you’ll get if you spin up a new lightsail wordpress install
If it’s the same or higher than the message being shown inside WordPress you can go ahead. If it’s not then you need to set a reminder to check back regularly on the lightsail creation page to see when the version updates.
AWS don’t use the very latest version available from Bitnami.
The final thing to consider… strangely is if WordPress supports the PHP version you’ll be upgrading to. WordPress maintain a list of which versions of PHP they support (properly and in beta).
Helpful? Say thank you.
Help me keep these guides up to date by showing your apprechiates with a small donation. Scan the QR code below, or buy me a coffee here.
Work in a software agency where you struggle to delivery consistently to your unique clients and unique projects? I specialise in agency challenges.