
UPDATE: I can confirm that updating PHP direction only for lightsail blueprint stacks (not bitnami blueprint stacks) is now possible. See Amazon’s guidance related to PHP vulnerabilities of Oct 2026
Specifically to resolve PHP vulnerabilities CVE-2026-109618 and CVE-2026-109619 I clicked to ‘Connect using SSH’ then ran sudo apt update` followed by sudo apt upgrade and following confirming the changes and running php -v I now see ‘8.2.35’ which is a patched version of PHP. I then ran `sudo systemctl restart apache2` as shown in the guidance above.
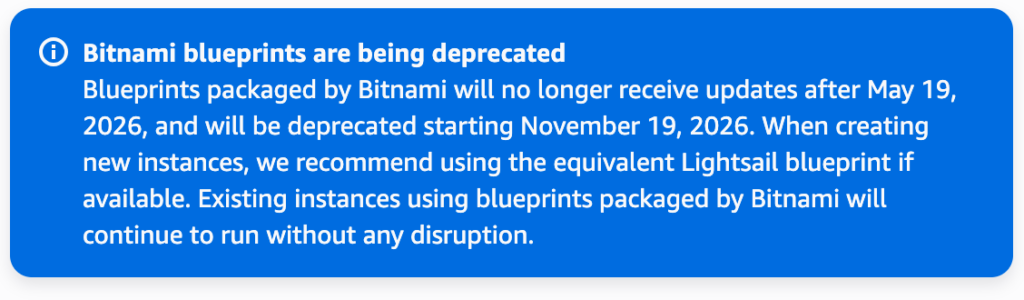
Previously lightsail used Bitnami blueprints for WordPress and other commonly used setups. But in 2025/26 Amazon made their own lightsail blueprints available, and are moving away from Bitnami options.
Note 1: Read this guide in full before you do anything. You’ll want to confirm it matches your situation and your expectations.
Note 2: You can’t simply update PHP on an AWS lightsail WordPress stack. You have to migrate to a new lightsail instance with the newer version of PHP on it. That is what this guide shows you how to do.
Note 3: This guide assumes you already have a static IP on your current Lightsail instance. If you don’t, you could possibly assign one in advance, but otherwise this guide is not for you.
Note 4: I’m planning to add a step or reference for those moving over from Bitnami to Lightsail blueprint. Things like htaccess files needs manual consideration as they’re outside the WordPress structure and are not automatically migrated.
I last ran through this guide myself on 15th October 2026 on this very site, which is about 800MB. It took it from PHP 8.4 to 8.2. Yes, lightsail instances appear to be behind where bitnami instances were, and I’m now seeing plugins that won’t update due to that. WordPress 7.1 was installed on both source and destination instances during the process.
Note that since Bitnami’s tool for SSL certificates is no longer available, the order of things needs to be changed to allow running of the new ‘Set up your WordPress website’ tool which handles domains and SSL certificates. There may be a little more time showing the maintenance page due to this. For me, 7 minutes.
No fluff. Limited details. Just 9 steps and 1 optional one.
1. Check your domain DNS
This step is new. But because AWS has a Site Setup tool which considers AAAA records, and some of you (like me) might be managing your domain and DNS outside AWS, we need a check here.
If you’re domain is managed outside AWS, go and check your domain DNS has an AAAA record which matches the IPV6 shown alongside the static IP address.
If it doesn’t, then add one (or more if linking www too), and then wait at least 15 minutes for DNS to propagate to avoid the Lightsail Site Setup tool telling you your DNS isn’t right.
Because you’re adding a matching IPv6 for the current IPv4 of your live site, this won’t cause issues.
2. Create a new AWS Lightsail instance
Location: Same as current instance, for me EU-West-2 (London)
Instance image: Linux apps => WordPress
Blueprint provider: Lightsail (not Bitnami)
Match the instance type and size of the current setup unless you know otherwise. Choose Lightsail as the blueprint provider. Choose a name you’ll remember for the following steps. For this guide, we’ll use New Instance, and Old Instance for our instance names.
For what it’s worth I use the same start to each instance name then add -07-26 in -mm-yy format so I can quickly find instances at a glance later.
Once your New Instance is in ‘running’ state move on…
3. Tweak the New Install’s PHP settings
Choose to ‘connect using SSH’ to New Instance on the Connect tab
Run cat application_credentials and take a note of the password displayed under ‘user’ for later
Run sudo nano /etc/php/8.2/apache2/php.ini
If the file doesn’t exist, run sudo ls /etc/php to check which folders (if not 8.2) do exist) and assuming only one, use that version in the command above.
Use ctrl-w to trigger a search inside the file, or look manually for the partial max_size and change the value of post_max_size from 80MB to whatever you need. It’s temporary, go wild. (I used 1000MB because my site was ~800MB)
Then use ctrl-w again to trigger a search, or look manually for the partial max_file and change the value of upload_max_filesize from 80MB to whatever you need. Again, it’s temporary. Again, go wild. (I used 1000MB because my site was ~800MB)
Use ctrl-x, then Y and enter to exit and save changes to the file.
Run sudo systemctl restart apache2 to restart Apache and apply the new upload limit settings
Close the SSH window. We’ll reopen it later.
4. Get migrate and maintenance ready
Open the New Instance’s wp-admin. If you don’t know how via the IP address, there’s a button at the top of the page in LightSail admin which says ‘Access WordPress Admin’. Log in using the username user
Go to plugins in the navigation on the left. You should see ‘All-in-One WP Migration and Backup’ already listed, but if you don’t then click ‘Add Plugin’ at the top. Then search in the field for `WP migrate`. Look for `All-in-One WP Migration and backup` and click to install. Then click Activate.
Click the ‘Add Plugin’ button and search for ‘Maintenance’ – Install ‘WP maintenance’ then click ‘Activate’.
Then click ‘WP maintenance’ in the left nav. Change the body text to ‘We’ll be back in a few minutes’, because the default message isn’t ideal. Save.
Enable maintenance mode, and save again. New install is now in maintenance mode, although you can still access it because you’re logged in as admin.
5. Export the live site from Old Instance
I do this at step 5 to limit the time between export and import, but if you’re not as bothered, you could save overall time by starting this step first, and doing other steps while the export is taking place.
Open the live site’s wp-admin on Old Instance. Go to plugins. Enable ‘All-in-One WP Migration’, or if required, click ‘Add New’ as above, install and activate it.
Click ‘All-in-One WP Migration’ in the left nav. Click ‘Export to’. Select ‘File’.
When the process has finished, click the download button to do the actual file downloading to your machine.
From step 6 you’ll want to move fast if limiting downtime (length of maintenance message display) is important to you. It took me about 7 minutes from this point for a 800MB WordPress site.
6. Move your static IP over
This is where I had most trouble due to the new Site setup tool. Likely caused by the AAAA IPv6 issue mentioned above.
In Lightsail admin in the left side navigation click Networking, then click the name of the static IP currently associated with your live site.
On the manage screen for the static IP, click to detach it from Old Instance. Then immediately reattach it to the New Instance.
Note: If for whatever reason you need to revert these changes and put the old site back, this should be the only change you need to undo. Point your static IP back to Old Instance.
7. Add an SSL Certificate to New Instance
We used to use bncert-tool, but now it’s all done via the ‘Setup your WordPress website’ tool.
Run the AWS Site Setup tool. For me I used custom domain, custom DNS, the existing static IP which we moved above. It’s likely less painful if your domain and DNS are managed in AWS.
Note that if the tools doesn’t recognise the static IP is attached, or it suggests creating a new one, you might need to wait a minute or two until it updates. Exit and restart the tool. There was an issue where SSLs issued before 9th August will fail to autorenew as well.
Additionally, bncert-tool used to allow a redirect from www to no-www or the other way. The new setup tool doesn’t offer this, so you might want to consider an .htaccess redirect or similar in /var/www/html/
If you get a red error on SSL generation, it’s likely an IP or DNS issue. You can double check any external DNS, ensure the static IP is associated with New Instance and that the Site Setup tool sees the IP as associated. Be sure to check both IPV4 and IPV6 if you have them in your domain’s DNS. Any changes take a few minutes for the tool to spot.
Eventually I got a blue banner telling me it might take up to 15 minutes, but it tool less than 2.
As soon as you get the green banner saying ‘Successfully configured the Let’s Encrypt SSL/TLS certificate on your instance’ and can access the maintenance screen via your domain name in a browser, you can move on…
8. Import to New Instance
Open up your live domain /wp-admin. Log in using your settings above. So user
Click the All-in-One WP Migration plugin on the left and choose import. Choose the File option. Select the migration file from your computer that you downloaded in step 4.
Wait. It should succeed. Only file size might stop it working, but fingers crossed. It will probably ask if you’re sure you want to continue / replace content.
You’ll also see a warning about a difference in PHP versions, for example “Your backup is from a PHP 8.2 but the site that you are importing to is PHP 8.4. This could cause the import to fail.” Hopefully it won’t, but if your old instance is very very out of date there’s probably a risk.
There you go. The site, file and database are moved to New Instance. That of course removes maintenance mode because all plugins and settings are replaced.
Only if it fails.. reverse the step 6 process above to get Old Instance back online.
9. Checks and putting the file size settings back
If you get 404 errors on post pages, or an ajax error on post/page save, you may have to go to General => Permalink settings and reselect the existing option and save it. I also logged out and back in at this point.
Check Settings => General. If your domain name shows as http:// and the field is readonly, you need to edit wp-config.php so in the New Instance SSH window…
Run sudo nano /var/www/wp-config.php find WP_HOME and WP_SITEURL and update from http:// to https:// – personally I have a simple setup and so also replace the $_SERVER variable with just the full domain too.
Go back up to step 2 above and reverse the changes to php.ini on New Instance – or don’t. It’s up to you. They default to 80M in case you forgot.
Again, only if anything fails.. reverse the step 6 process above to get Old Instance back online.
10. Optional: Remove Old Instance
You could now ‘Stop’ or even remove Old Instance. I usually Stop mine and keep it a few days before removing just in case anything unexpected happens.
If you messed anything up above, the only change required to go back is step 6 in reverse. Point the static IP back to Old Instance. Ensure it’s not Stopped first.
Helpful right?
Help me keep these guides up to date by showing your appreciates with a small donation. Scan the QR code below, or buy me a coffee here.
