Replace Spotlight With Alfred App

If you own a Mac and you haven’t heard of Alfred App then you’ve likely been living in a bunker for a while.

At very least Alfred allows you to quickly start applications. If you choose to delve deeper you can use it to search and open files, run applescripts, quick jump to webpage searches, send emails, control iTunes and 999 other clever tricks.

When you first get your Mac you will likely have heard of Spotlight, a built in application that can be used to search applications and files. It’s hotkey is cmd-space. It isn’t as flexible as Alfred App but it has the best hotkey combination going.

Before we start if you’ve turned off Alfred’s menu bar icon, turn it back on in Alfred appearance preferences. It’s makes for the easiest method of opening during hotkey move.

Here is how to move Alfred App to use cmd-space and Spotlight to use ctrl-space:

System Preferences -> Keyboard -> Keyboard Shortcuts

spotlight keyboard shortcuts

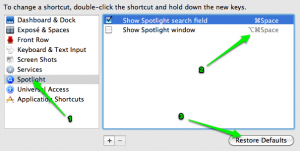
1) In the left column click Spotlight.
2) In the right column click the current key combination for spotlight of ⌘Space (cmd-space) and input your replacement key combination. I recommend ^Space (ctrl-space) although some other applications occasionally reserve it (such as Things App). At this point if you can see it you could also switch the second hotkey combination over to ⌥^Space (alt-ctrl-space).
3) Don’t worry about remembering the old hotkeys. If you change your mind later as you can click Restore Defaults to undo your changes.

You can close system preferences now.

So we’ve moved Spotlight, but now we need to move Alfred to ⌘Space (cmd-space).

Click on Alfred’s top hat menu bar icon and select preferences. (you may need to restart Alfred at this point for it to recognise that you’ve moved Spotlight to a new hotkey.

Choose General and you should see a large box Alfred Hotkey box. Click it and press our new hotkey for Alfred App.
⌘Space (cmd-space)

Alfred Preferences

And that’s it. You should now see Spotlight when you hit ^Space (ctrl-space) and Alfred when you click ⌘Space (cmd-space).

Kiwi App Theme Retweeter Text Position Hack

Kiwi is a twitter client for Mac that offers all the benefits of the Twitter for Mac and more. Check it out.

Anyway, one of kiwi’s most amazing features is templates. You can change standard css, html and images to make the client look exactly how you like. Change the design of the timeline or use one of the free kiwi themes that other people have created.

I was immediately drawn to the Twitlike theme which mimics the existing Twitter for Mac design. After installing it to kiwi there were a couple of things I wanted to change. The first being, if the tweet was actually a retweet, Kiwi inserts the retweet information before the actual tweet text, and I didn’t want it to show above the text, I wanted the retweet information to show below out of the way.

Luckily using a bit of css magic I worked out how to move the retweet information. First I added a border to all <div> tags so I could see what made up the html of the tweets text. Bingo; the retweet information is in it’s own div.

Here is part of my html template:

%recipient%
%text%
 

So the css selector I needed to grab all text was .tweet .text and the selector for the retweet information was .tweet .text div

/* the retweet info */
.tweet .tweet-text div {
	overflow: hidden;
	height: 13px;
	position: absolute;
	left: 0;
	bottom: -20px;
}

/* the tweet text */
.tweet .text {
    -webkit-user-select: text;
	margin-top: 3px;
	margin-bottom: 5px;
	position: relative;
}

/* the tweet text if this is a retweet */
.tweet.retweet .text {
	margin-bottom: 20px;
}

As you can see above. If it’s a retweet I add a larger margin bottom to the text so there is space to show the retweeter information. I then position absolute the retweeter information, give it a fixed height and overflow hidden incase it’s massive.

Kiwi are kind enough to add a .retweet class where applicable, so I can only apply these styles where required. Bingo:

kiki app screen shot

I noticed that someone else asked this question on the kiwi discussion forums and the official kiwi reply was that it was a know request to have a separate template elements for the retweet information. Let’s hope that a new version on Kiwi brings that to us.

Hide topics row in Postbox message view

I love Postbox. I talk about it a lot. However Postbox is trying to be more than a mail client and as part of that is attempting to sneak into the world of GTD with the inclusion of todos and topics.

Now call me old fashioned but I use Things for my GTD stuff and so don’t use todos or topics in Postbox.

“Not a problem really is it?” I hear you yell. Well no until you look at the amount of space the topic row of Message View takes up. Believe me on a small screen this matters:

Continue reading

Setting File Owner in Terminal

Sometimes OS X won’t let you change the owner of file using Finder. Annoying. Here are the simple steps to do it in Terminal.

First if you are just looking for the command it’s:

sudo chown -R _new_owner /root/to/file.txt

Where _new_owner is the name of the new owner you want to assign to the file

Now the steps:

1. Open Terminal, which you will find in Applications -> Utilities
2. Type in sudo chown -R _new_owner
3. Type the file path OR drag the file from finder onto the line after _new_owner to make the path appear.
4. Hit the enter key
5. You may have to type your OSX login password if prompted
6. Repeat for any other files you want to change